Wednesday 10 September 2014

A HOT Tip To Help Increase Your Chilli Yield

I don’t know about you, but I have experienced endless frustration over the years with my chilli plants.  Year after year, my excitement levels soar as I watch the number of flowers on my chilli plants increase exponentially. I watch them lovingly and daydream about what I will do with the glut of chillies that is obviously about to come my way.  I imagine luscious stews with increased depth of flavour, the smell of freshly baked chocolate chilli bread loaves permeating the house, the hot/cold contrast of chilli ice cream and I salivate at the very thought.  However, my dreams are short lived and rudely interrupted by the unwelcome sight of flower after flower dropping off, no swelling of flower stalks (a tell tale sign that the flower will go on to greater things) and the harsh reality that like every other year, this year will be full of broken promises by my chilli plant, which doubtlessly yields not even one measly chilli.


You will all appreciate that there is only so much disappointment one person can bear.  I was ready to wave my white flag of surrender to the chilli growing world and pack it in once and for all, but then a handy tip came my way from my very wise and talented Mother-in-Law.  Having experienced the euphoric sensation of success, I am now ready to impart this pearl of wisdom on any and all who will hear it.  Read on, you beautiful veggie growers, and get ready for a veritable chilli feast.

This problem with a feast of flowers followed by a famine of chillies appears to be a pollination issue.  As a result, the plants that will be mostly affected by it are the ones that are not grown in the great outdoors.  Living in Northern Ireland, I am forced to grow my chilli plants in a protected environment.  Like most of us, they go into shock when confronted by the harsh Northern Irish climate.  The only difference is, they seem less likely to recover.  If the truth be told, I do not know whether chillies rely on wind or insect pollination or perhaps both.  What I do know, is that when they are grown indoors, they are generally protected from both wind and insects, which effectively stops the pollination process.  I had researched this online and there is many an article citing that the sure fire way of achieving an increased yield is through gently shaking the flower stems, thus releasing the pollen and allowing pollination to occur.  I have absolutely no doubt that this method works for many a chilli grower out there; it simply has never worked for me.  I tried it for years to no avail.

I was having this exact conversation with my (as previously stated) very wise and talented Mother-In-Law.  She had been minding my chilli plant for me whilst we were on holiday and commented on how many flowers it had.  With a despondent tone in my voice, I advised her that I was confident that all these flowers would simply drop off or wither and die, as they had done in previous years.  I declared with great conviction that the likelihood of any manner of chilli yield, no matter its insignificance, was a big, fat zero.  Patiently, and with the air of a therapist about her, she questioned my disillusionment.  I went through my turbulent history with chilli plants and explained that, despite my continued efforts, I seemed doomed to failure on a yearly basis.  She allowed me to both vent my frustrations and wallow in self-pity, before asking one simple question: “Louise, have you ever tried to brush them?”.  I had no idea what she was talking about and was quietly convinced that old age must finally have taken hold of her.

As it turns out, this was probably the most astute moment of her veggie growing life.  She explained to me that by taking a paintbrush (or a basting brush, in my case) and brushing the stamen of the open flowers, the pollen becomes settled on the bristles.  If you then take the brush and brush another open flower, you transfer the pollen onto that flower, effectively pollinating it.  You can keep on doing this across all the open flowers on the plant, ensuring that each and every one of them has been pollinated.  This tip is sheer brilliance!  You have to trust me on this one.  I went home and dutifully brushed each and every open flower on the plant.  Low and behold, within no time, the chillies came and they continue to come to this day.  Every time I see new flowers appearing on my chilli plant, out comes the basting brush and I start brushing.  Of course, there are a few casualties along the way and some still wither and die, but it is of far more importance that some yield chillies, which I and the rest of my family get to enjoy.


Needless to say, the white flag of surrender was promptly thrown in the bin.  These days my daydreams are not rudely interrupted by some harsh reality and I still salivate at the thought of all the delicious concoctions I can whip up with my chillies.  The only difference is that when I salivate now, I can also taste the sweet taste of success.

Give it a go.  I promise you, you’ll thank me later. :)

Wednesday 30 October 2013

The Big Surprises of 2013

Ok, so i haven't blogged for quite a while, but I promise I have a good reason.  The reason is that I was pregnant last year and my wonderful baby boy, Jude, was born on the 25th February this year.  As a result of this wonderful blessing, I have had limited time to do anything green fingered.


That having been said, I did throw a few potatoes in a couple of pots and the vegetable patch and hoped for the best.  It would be prudent to point out that I did very little in the way of nurturing these
little gems. I adopted an attitude of 'let's see what Mother Nature can do here' and handed the exercise
 over to her while quipping in a typically Irish fashion, "Good luck to ye".  Well, let it be known that
Mother Nature did not disappoint, for despite my neglect and complete lack of earthing up and fertilising, I yielded not one, not two but three good crops from these bad boys.  I tell you all this, so that even the idlest of you out there may realise that growing potatoes requires little or no effort and is likely to yield excellent results. I'm hoping to inspire!  That was surprise number 1 of 2013.


Surprise number 2 was provided by my raspberry bushes, which I planted in a pot last year from a cutting. I did prune them back at the end of last season as is meant to be done, but having had not one raspberry in 2012, I was not expecting to get 3 brilliant crops in 2013. Apart from a vastly improved season this year, the only thing I can think of to which this success can be attributed is the fact that I fed the plants with tomato feed on a few occasions throughout thus season.  So, for those of you who are struggling with these bushes not bearing fruit, I recommend giving some tomato feed a try.


So, there you have it, nothing very exciting, but just a little something for you to ponder whilst you wait for the 2014 growing season.   


Wednesday 11 April 2012

Things You Should Have Done But Can Still Do In Preparation For The 2012 Growing Season

Yes, it’s true!  As with everything in life, good preparation will almost certainly improve your chances of success in the wonderful world of Grow Your Own.  Now, I know that the word ‘preparation’ to many may as well be a synonym for the word ‘chore’, but just keep reminding yourself that you will reap the rewards in Summer of good housekeeping now.

In theory, the housekeeping should really be carried out before the season starts so that you’re rearing to go when Spring finally arrives.  In practice, however, it is cold and miserable in January and February and sitting in front of the fire with a glass of wine seems far more appealing than being outside and freezing to the core whilst undertaking some gardening housework.  Never fear!  As the old saying goes, it’s better late than never.  You can still get out there and do what needs to be done with plenty of time to spare to cultivate a prolific harvest in Summer.

At this stage, you are probably left wondering what housekeeping exactly I am referring to.  Well, here it is.

1. Clean the Greenhouse
For those of you that have previously invested in a greenhouse of any size, shape or description, it is essential to clean it at the start of the season.  This is probably one of the most important jobs to do, because it ensures that any pests and diseases that may be lurking are well and truly purged before any new seeds and seedlings can get infested and infected by them.  As far as I can tell, Jeyes Fluid comes highly recommended as an effective disinfectant and I’m quite sure that this is true.  However, if, like me, you don’t have any Jeyes Fluid and are keen to get the greenhouse cleaned as soon as possible, then an alternative is standard washing up liquid.

Be sure to scrub thoroughly and ensure that you wash down all shelving and racks as well.  There is no nook or cranny where pests and diseases won’t lurk, given half the opportunity.  Once you have scrubbed down the greenhouse, it will be gleaming, which in itself will no doubt provide you with a sense of accomplishment and an ardent desire to fill it with little signs of life.

2. Prepare The Vegetable Patch
If you had a vegetable patch last season or indeed if you are intending to have one this season, it needs to be prepared.  How it is prepared will essentially vary from one patch to another depending on soil conditions and so on.  However, in a nutshell, you should be looking at possibly adding some fresh top soil and compost or an alternative mulch.  Also, work some fertiliser into the soil at least one week or so before you intend to sow any seeds or plant out any seedlings and small plants.  After fertilising, water your patch well.

Do be sure to follow the instructions on the packet when fertilising though.  If you are too heavy handed with the fertiliser, your veggies won’t thank you for it and may end up dying.  Trust me on this one, I’m talking from experience!

If you had a veggie patch last season, you may also need to do some weeding.  Keep a close eye on these unwanted pests and try to rid your patch of them when they are young and small.  It’s a much easier job at this stage than when they have had a chance to develop a strong root system.  There is a good chance that weeds will just keep reappearing no matter how much effort you put into eliminating them, so get to grips with the weeding process as you will more than likely be doing it the entire season.

3. Clean All The Pots
Although it may sound as though cleaning the greenhouse and preparing the veggie patch are the biggest jobs at hand, cleaning all your pots can be equally, if not more, daunting a task.  In reality, it all depends on how many pots and containers you have accumulated for re-use.  As with cleaning the greenhouse, the pot cleaning ritual is vital.  Once again pests and diseases can lurk from last season and can cause devastation to you and whatever poor veggies are affected.  Not only will this reduce your yield, but is bound to dent your spirit to some degree as well.  It’s simply not worth it to leave this task undone. 

You should be pleased to know that there is no need to scrub the containers down so that they are glistening, gleaming and looking brand new.  They simply need to be rinsed out with some washing up liquid to remove the majority of the debris that remains.  Once this is done, they are ready to rock and roll and to house your future contributions to your five a day.

4. Check Existing Seeds & Stock Up on Fresh Seeds
Many seeds can keep for a number of years if stored in the correct conditions.  These conditions are usually cool, dark and dry but I wouldn’t get too hung up on this.  In my (somewhat limited) experience, you near enough have to make an active destruction attempt in order to ruin them.  That having been said, check the ‘use by’ date on the packets to ensure that your seeds are still in date.  Throw away seeds that are out of date.  Onion sets don’t keep for the same length of time as other seeds, so they will inevitably only last you the season in which they were bought

If you have decided that you are going to attempt some new veggies this year and/or you have had to throw away some out of date seeds, head down to your local garden centre and stock up.  Quite obviously, you can’t grow it if you don’t own it.

5. Stock Up On Compost
Compost is the one thing that you will go through at a rate of knots.  Even if you have compost left over from last year, get some more.  You will need it at some point and stocking up now means fewer trips to the garden centre later on.  Ensure that you buy a compost that is suitable for growing fruit and vegetables.  You can buy compost designed specifically for this purpose, but if you are unable to find it, a good multi-purpose compost is equally as fit for purpose.  Do not forget to stock up on seed sowing compost as well.  This type of compost is essential at the start of the season when all your efforts will be channelled into sowing seeds.  It is extremely nutrient rich and provides the correct balance of all these nutrients to ensure strong root development and to give seedlings the start to life that they deserve.

6. Plan! Plan! Plan!
Spend some time giving thought to exactly what veggies you want to grow this season.  Take note of the best sowing times for them and how long they will take to reach harvest time, so that you can decide when to sow what.  You may also wish to consider successional sowing this year.  This is the idea whereby you avoid the feast and famine principle of having excess quantities at certain times and absolutely nothing at other times.  With successional sowing, you sow little and often to ensure that you have a continuous supply of veggies throughout the season.  I, myself, fell victim to feast and famine last season, so I’m giving successional sowing a try this season, leaving a period of in or around three weeks between sowings.

You might find it handy to write down what your plans are and when you intend to sow your different varieties to help you keep track.  A garden journal is ideal for this purpose.  You will also find that this year’s plans will come in handy next year when you will be in a position to determine where you succeeded and where you didn’t this time round.


A Gardening Journal is an excellent way to keep track of your season.
It allows you to plan effectively, as well as monitor your successes and failures.

Monday 26 March 2012

And So We Welcome Spring 2012...


It’s that time of year again when the clouds clear and the sun gets its moment of glory and shines all day long.  The days seem to go on forever and the garden is alive with the promise of new life and new growth.  Finally, we can all celebrate because Spring has arrived.

For me, this is a particularly exciting time of year, as my months of planning finally culminate in the sowing of seeds, bulbs, tubers and the occasional tree. The ‘Grow Your Own’ season is here and is underway with a bang.

This year my vegetable growing hobby has expanded to include a small vegetable patch in my garden.  This prospect is such an exciting one that it has left me feeling like a small child waiting for Santa Claus to arrive.  It has opened several new doors and enabled me to explore many different avenues and vegetable varieties that I was unable to explore last year when I was growing solely in containers.  Of course, a vegetable patch requires a lot more preparation and planning than container growing, but there are some great websites and books out there that provide endless advice and support.  I stumbled across a fantastic website that enables you to sketch out your patch online, which I found extremely useful.

Now, this vegetable patch in no way means that my container growing days are a thing of the past.  Quite the contrary, in fact, I intend to make as much use of containers this year as I did last year.  There are plenty of varieties of vegetables that are far better suited to container growing and I shall continue to grow these in this way to ensure maximum yield.  However, there are some varieties that are perhaps better suited to being grown in the ground, especially if they are bigger, bushier plants.

In a nutshell, I shall be exploring the wonderful world of the veggie patch as well as building on previous experience gained in container growing.  I’ll be blogging as I go on both areas with any little useful pieces of information that could come in handy for other keen but clueless GYO enthusiasts.  My plan for this year, although this is subject to change, is to grow the following:

         Veggie Patch:

  1. Runner Beans
  2. Peas
  3. Carrots
  4. Broccoli
  5. Onion
  6. Chillies & Peppers

        Containers:

  1. Basil
  2. Mint
  3. Parsley
  4. Rocket
  5. Tomatoes
  6. Potatoes
  7. Garlic
  8. Strawberries
  9. Raspberries

As I previously mentioned, I’ll be blogging as I go and hope to provide lots of useful tips and handy information along the way.  My blogging goal for 2012 is to blog about each and every veggie that I grow in a way that is useful to those who are reading it.  Hopefully, I can help all my followers in some small way to have a successful and prolific 2012 season.   

So, keep following and you may just encounter the very piece of information that you were looking for to get you going.

Happy growing!

Sunday 12 June 2011

Something You Should Know About Supermarket Herbs

As I stood making myself a cup of mint tea (with homegrown mint), I cast my eye across the kitchen and espied my pot of rosemary that I bought from the supermarket to tide me over whilst I patiently wait for my own rosemary seeds to germinate.  Seeing the pot reminded me of something that I read about supermarket herb plants and I was overcome with the need to share this little gem of information with all budding Grow-Your-Own folk.  After all, nothing is lost when one candle lights another.


Have you ever noticed that when you buy a herb plant from the supermarket, it seems to have a disappointingly short life span?  You bring it into your life, place it on a sunny windowsill or some other highly appropriate spot and shower it with TLC, hopeful that all this care and attention will ensure that the plant will continue to bring you endless joy for time immemorial.  Alas!  After a few weeks you realise that no matter how much TLC you give it, it seems intent on keeling over and dieing on you, just as you begin to truly appreciate its contributions to your culinary adventures.  As it turns out, there is a very good reason for this.  Apparently, the herb's life span is as short as it is due to the fact that there are too many plants potted in too small a pot.  This prevents the individual plants within the pot from maturing to the extent that they can because they do not have enough space for their root systems to become well established.

This knowledge is invaluable because the solutions are so incredibly simple and you can get so much more out of your supermarket herbs if you rectify this uncomplicated problem.  There are at least two things that you could do to ensure that your herb plant lasts longer.  The first thing is rifle around the soil that it is potted in and see how many different plants are actually in the pot.  Once you've established this, you can simply repot each of them into their own individual containers.  Not only will you instantaneously have 'more' herb plants, but each one of them will be able to be their own plant and thus grow much bigger and better than they ever could have in their previously cramped conditions. The second solution is to repot the entire thing into one much bigger pot that will provide each little plant with the space that it requires to flourish and grow for as long as possible.  If you decide that this solution is the one for you, be sure to check the distance between each of the individual plants.  It may well be that they will need to be spaced further apart in the bigger container if they are to develop as nature had intended.  You can find this information virtually anywhere: online, the back of seed packets and books to name a few places, so don't be deterred if you are unsure of the correct distance that should exist between the plants.  I can guarantee you that you will have an answer within five minutes of looking for it.

Armed with this jewel of knowledge, you can now take steps to ensure that you get the most out of your supermarket herb plants, converting them from 2-3 week wonders into robust, bushy beauties bursting with herbal goodness.

You're welcome! :-)

Tuesday 7 June 2011

The Thing About Mint...

Mint is such a wonderful, aromatic and versatile herb.  It is the kind of herb that instantly puts you in a good mood the minute its magnificent aroma hits your senses.  There are very few meals out there that cannot be enhanced in some way by the addition of a little mint to one of its elements (especially in respect of our favourite course...dessert).  Obviously, we cannot forget our liquid diet in the discussion about this wonderful herb.  Mint goes a long way to spicing up a glass of water when combined with some ice and a little lemon or lime.  Mint tea is incredibly refreshing and the all important Mojito would not exist if it were not for this little herbal gem.

Besides its culinary accomplishments, Peppermint also has a number of health benefits.  Apparently, it's not only calmative and an anti-spasmodic, but it has anti-inflammatory, anti-bacterial and anti-parasitic properties too.  Who knew?? Furthermore, Peppermint can be used in a number of ways for gastro-intestinal problems to assist where anti-spasmodic, anti-flatulent and appetite-promoting stimulation is in order.  In addition, it has been known to ease nervous headaches and can help enhance concentration.

There appears to be no end to the list of reasons that we should all have a little bit of mint brightening up our homes.  At this juncture, it would be prudent of me to advise all you budding Grow-Your-Own folk that growing Mint is not without its complications.  With this in mind, I thought it would be handy to inform you of these complications so that you don't have to find out about them the hard way, like I did.  I'm hoping that this will, in turn, keep your Mint growing experience a happy and productive one.

The thing about Mint is that it can be difficult to grow from seed.  Personally, I have had success with my mint seeds but I have read numerous articles commenting on just how difficult this can be.  Many of these articles, as well as books that I have read, state that in addition to being difficult to grow, the mint seeds that you can buy are not worthwhile. Mint hybridises like crazy, so it would appear as though the plants that you grow from seed are unlikely to smell or taste very strongly of the variety of mint that you thought you bought.  My mint plants are still small and I have yet to establish how strong the taste and smell of the leaves are.  I am confident that they will be beautiful, but that's probably more to do with the pride that consumes me when I see the plants thriving as they are, more than anything else.  Armed with this knowledge about shop bought mint seeds, I have lower expectations of my mint plants and to be honest, as long as they smell of some variety of mint I think I'll be able to cope.  Nevertheless, the general consensus seems to be that it is a better idea to buy established Mint plants from garden centres and to care for these to ensure ongoing growth.

Another handy tip about Mint is that it is a viciously invasive plant.  It tends to take over the garden.  For this reason, container growing for Mint is highly recommended.  This having been said, do not despair if you have set aside a special spot in your garden for your Mint beauties.  All you need to remember is that if you want to plant Mint in the garden, do not remove it from its container.  Simply sink the container into the soil and this will keep its roots confined.  'Confined' is a key word in that sentence because the downside of this method is that the confinement of the roots can prevent your Mint plant from maturing as nature had intended.  I don't really know how often Mint is adversely affected by this confinement though because I have read plenty of stories about people who have planted their Mint into their gardens by sinking the containers into the soil with the end result being that the Mint still seemed to colonise the garden.  It's a very eager grower, our friend Mint, and it will do anything to spread its joy around. 

Mint also reroots very easily and so cuttings are another great way to grow them.  However, I have found with a Mint plant that was given to me that it seems to be able to reroot from anywhere.  This particular plant grew heavy and started to lean sideways causing some of the stems to rest on the soil in the container.  These stems have sebsequently rooted themselves firmly down.  I found this behaviour incredibly bizarre but it is true.  It was one of the things that made me realise just how easily Mint could spread if it was left to its own devices.  For this reason, I strongly recommend keeping your Mint well trimmed.  Not only will this
encourage it to bush out as opposed to becoming lanky, but it will also help to prevent it taking over as if it is Master and Commander.

Mint will die right down during the winter.  Do not fret, friends!  It will grow back.  Once established, there seems to be very little that can stop a Mint plant from continuing to flourish.  They are incredibly hardy and can survive a huge amount of neglect.  The only thing that seems to harm them is extreme heat.  Try and keep your plants somewhere slightly more shaded and you will be able to enjoy the sweet aroma and taste of mint together with all its culinary and health benefits for a long time to come.

Wednesday 27 April 2011

Growing Potatoes In Growbags

I find growing potatoes to be one of the most enjoyable aspects of growing veggies at home.  There are few things in life that are as comforting and delicious as good old spuds.  It is incredible the difference it makes to the humble spud to grow it at home.  I have found home grown ones to be far more fluffy and soft than shop bought ones.  Furthermore, in my opinion, the skin on homegrown spuds is so much tastier than that of its shop bought brother.

Spuds are so simple to grow and there's a variety of ways in which you can grow them.  You don't need to grow them in growbags at all.  If you have space in your garden, then stick some in there.  Last year, I planted three spuds in a window box and enjoyed a good crop of little potatoes.  Obviously, the more space they have, the bigger they can grow (they're a bit like goldfish that way).  Growbags are a fantastic alternative because they have a lot of depth, which provides the spuds with plenty of space (translation: plenty of good size spuds for you) and they don't take up a lot of space, making them ideal for people who don't have a big garden.  They can be kept indoors, on patios, on balconies, outside; wherever you want really.  In short, growbags are the kind of tool that fit in with your life, as opposed to you having to make concessions for them.


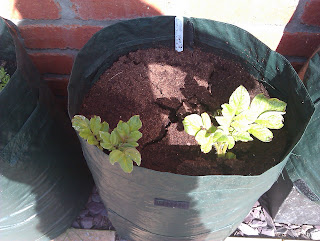
Growbags

When choosing a variety of spuds to grow, decide what you like to do with your spuds.  In other words, do you like to mash them or bake them or make them into a salad etc.  Knowing what your intentions with respect to your spuds are, will position you far better to select a variety of spud that is right for you.  You can go to garden centres like B&Q and Homebase and buy spuds for planting and there is absolutely nothing wrong with this if you choose do so.  However, I always find that I have spuds left over after I've bought a bag from the supermarket, so I just place these in a plastic bag in a dark cupboard and leave them to grow roots.  Then I plant them. Simple!

TIP: I mentioned in a previous post that you should wait for the roots to turn white.  They will be green when they first start to grow, but if you leave them for a while they will soon turn white and be ready to go into the ground.

So...now you have your growbags, your soil and your spuds.  The big question is how do you combine all of these elements to form a masterpiece that will yield a magical return.  Look no further, you wonderful budding gardeners, the answer is revealed below.

First things first, you must ensure that the time of year is right for planting spuds.  The first crop can be planted in Spring.  These should be ready for harvesting in Summer.  You can also plant in Summer and these should be ready in Autumn.  So, really anytime between Spring and Summer, you can plant spuds till your hearts content.

TIP FOR UK GROWERS: Your first batch of spuds should be planted after St. Patrick's Day on the 17th March 2011.

Having determined that the time is right to grow your own spuds, open up your growbag and fill it approximately one quarter of the way with some good quality soil.  I recommend using fruit and veg compost, as it has all the nutrients necessary to help your spuds grow into healthy, wonderful delights.  You may want to add a bit of fertiliser to give the soil a bit of extra oomph.  Place you spuds in the soil with the roots facing upwards.  You simply need to push them into the soil until they can stand upright on their own, which should be the depth of about half the spud.  You could probably plant about 5 or 6 spuds per growbag, depending on the size of the spuds you're using.  Once you have done this, cover the spuds with soil to about half way up the growbag.  You should ensure that all the roots are covered and there is no part of the spud sticking out.  Give them a good watering.  You will notice that the soil will draw down once you have watered it.  I would say that 3 good waterings with a watering can should be sufficient.

Now that you have done the ground work, you can leave your spuds to blossom and grow.  You will notice after a few weeks (perhaps even less) that your spud plants will start to grow through the soil. 


When you see the leaves coming out, fill the growbag to the top with soil.  This will fool the spuds into believing that they have not yet begun to grow and will ensure that you end up with many more spuds than you would otherwise have done.  They may be tasty and delicious, but they're not very bright!  Once you have filled your growbag to the top, give it another good watering, about 2 or 3 times with the watering can and leave your spud plants to grow.  Once again, this should only take a few weeks.


The key to harvesting spuds is flowers!  When your potato plants start to flower, it means that your spuds are ready for harvesting.  That is not to say that it is not altogether unlikely that your plants may not flower.  My plants didn't flower last year and I was deeply concerned that my spuds had failed.  However, it's good to know that no flowers does not necessarily mean no spuds.  When I dug up my flowerless spuds last year, I had a good crop.  So,  if you don't have any flowers after approximately 3 months, just dig up your spuds anyway and you will be surprised to find the delightful treasures that await you beneath the soil.


The most fabulous thing about growbags is that they enable you to dig out your spuds from underneath.  They have a pouch at the bottom that you open up when your spuds are ready for harvesting and dig them out this way.  This minimises mess and enables you to get straight to the point with digging them up.  I absolutely LOVE this idea!


The growbag's pouch is one of the best things about them. You can dig the spuds out from the bottom!

Once you have opened your pouch and dug out your beautiful spuds, all that is left for you to do is cook them in a manner you so choose and enjoy them!

Growing spuds in a growbag is probably one of the simplest veggie growing processes and I highly recommend it for novices to give you some inspiration to get growing.  In fact, growing spuds in general is an easy process, whether it be in growbags, in a window box or directly into a garden.  You really should give it a go.  If there is one thing that will motivate you to keep going with the whole veggie growing concept, it has to be growing your own spuds!  So, go out there; get yourself a growbag (cheap), some soil (cheap) and some leftover spuds (cheap) and reap the veggies of your labour as soon as possible.